这篇文章整理了常用opencv函数(用途、参数的意义,必要时也会列出该函数所在的头文件)以及一些其它关于opencv库的知识。补充了一些版本之间的头文件、函数等的调整。
一、基础
1
- 查看版本
pkg-config --modversion opencv
如果要看cv 头文件里面具体的cpp实现,必须要去源码里面看。安装opencv的时候那些具体实现都被编译成二进制的库了。只能跳转到头文件。
3. 版本改动
OpenCV2到OpenCV3之间的改动比较小,而且现在的这些版本已经比较老了。所以此处给出的改动主要是2和3改到OpenCV4。可以参考此处,给出了很多有用的信息。
1. 头文件变动
/* old version ---> compatible with ros-noetic*/
#include <opencv/cv.h> //---> <opencv2/opencv.hpp>
#include <opencv/cxcore.h> //---> <opencv2/core/core_c.h>
#include <opencv/highgui.h> //---> <opencv2/highgui.hpp>
#include <opencv/imgproc.hpp> //---> <opencv2/imgproc.hpp>
2. was not declared in this scope
如果使用的opencv为3.2.0。
// CV_WINDOW_AUTOSIZE’ was not declared in this scope
#include <opencv2/highgui/highgui_c.h>

// cvGetWindowHandle’ was not declared in this scope
#include <opencv2/highgui/highgui_c.h>

// CV_LOAD_IMAGE_UNCHANGED’ was not declared in this scope
#include <opencv2/imgcodecs/imgcodecs_c.h>
3. 判断所用的opencv的版本
#include <iostream>
#include <opencv2/core/version.hpp>
#include <opencv2/core/core.hpp>

using namespace cv;

#if CV_VERSION_EPOCH == 2
#define OPENCV2
#elif CV_VERSION_MAJOR == 3
#define  OPENCV3
#else
#error Not support this OpenCV version
5
cvMat停用,只能用cv::Mat.
cvCreateMat是老版本产生cvMat的函数,应改用新的数据结构和构造函数。
二、
1. data()
2
三、matrix
- cvSVD
calculate singular values and singular vectors.
flagis below.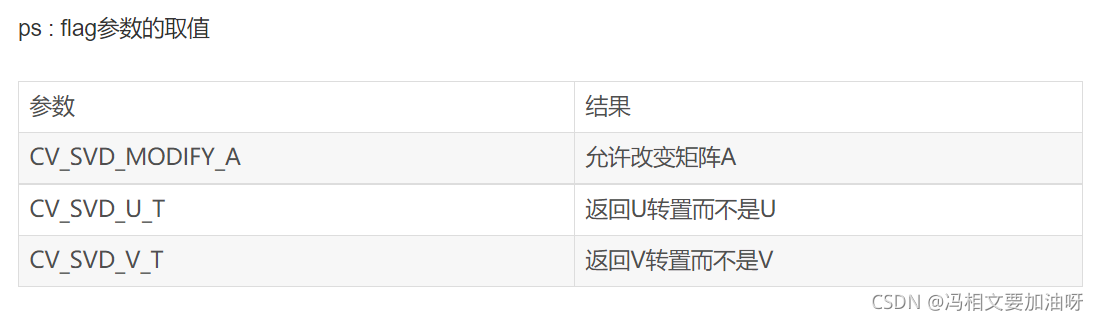
// (输入矩阵,结果奇异值矩阵,可选的左部正交矩阵,可选右部正交矩阵,flag): 奇异值都是非负的并按降序存储
void cvSVD( CvArr* A, CvArr* W, CvArr* U = NULL, CvArr* V = NULL, int flags = 0);
3. solve
// src mat: square size and be symmetrical
// the eigenvalues are stored in the descending order. the eigenvectors are stored as subsequent matrix rows, in the same order as the corresponding eigenvalues.
// https://docs.opencv.org/3.4/d2/de8/group__core__array.html#ga9fa0d58657f60eaa6c71f6fbb40456e3
bool cv::eigen (InputArray src, OutputArray eigenvalues, OutputArray eigenvectors = noArray() );

// ( left-hand input matrix, right-hand input matrix, output solution, matrix decomposition types)
bool solve(const Mat & src1, const Mat & src2, Mat & dst, int flags = DECOMP_LU);

//matVA is eigenvalues in the descending order 降序保存的特征值; matVE is eigenvector 特征向量
cv::eigen(matAC, matVA, matVE);
OpenCV allows the distortion coefficients vector to have several possible lengths:
| Number of values | Meaning |
|---|---|
| 4 | [k1, k2, p1, p2] — the most common case (two radial, two tangential) |
| 5 | [k1, k2, p1, p2, k3] — adds a 3rd radial term |
| 8 or 12 | [k1, k2, p1, p2, k3, k4, k5, k6, s1, s2, s3, s4] — for advanced camera models (rational or thin-prism) |
// (in,out,*,*,new camera matrix)
cv::undistortPoints(ptc1, ptc2, cameraMatrix, distCoeffs, cameraMatrix);
other
colorize
applyColorMap
void cv::applyColorMap(InputArray src, OutputArray dst, ColormapTypes colormap);
Input must be CV_8UC1 (grayscale). If not, convert using:
cv::Mat gray;
cv::normalize(src, gray, 0, 255, cv::NORM_MINMAX);
gray.convertTo(gray, CV_8U);
Common Colormaps
| Name | Constant | Description |
|---|---|---|
COLORMAP_JET |
2 | Blue → Green → Red (like MATLAB “jet”) |
COLORMAP_HOT |
11 | Black → Red → Yellow → White |
COLORMAP_COOL |
8 | Cyan → Magenta |
COLORMAP_VIRIDIS |
16 | Smooth perceptually uniform map (modern default) |
COLORMAP_INFERNO |
17 | High-contrast “fire-like” map |
COLORMAP_TURBO |
22 | Google’s “turbo” perceptual map (vivid, balanced) |
COLORMAP_PARULA |
12 | MATLAB’s “parula” |
COLORMAP_MAGMA |
18 | Black → Red → White gradient |
COLORMAP_CIVIDIS |
21 | Color-blind friendly variant of “viridis” |
LUT(Look-Up Table)
cv::LUT() (Look-Up Table) replaces each pixel’s intensity value (0–255) in a grayscale image with a corresponding color from a user-defined table.
Function Signature
void cv::LUT(InputArray src, InputArray lut, OutputArray dst);
// src: single-channel grayscale image (CV_8UC1)
// lut: lookup table (size 256×1, type CV_8UC3)
// dst: output color image (CV_8UC3)
Example
#include <opencv2/opencv.hpp>
#include <iostream>

int main() {
    // Step 1. Create a grayscale test image
    cv::Mat gray(256, 256, CV_8UC1);
    for (int i = 0; i < 256; ++i)
        gray.row(i).setTo(i);

    // Step 2. Create custom LUT (Blue → White → Red)
    cv::Mat lut(1, 256, CV_8UC3);

    for (int i = 0; i < 256; ++i) {
        cv::Vec3b color;
        if (i < 128) {
            // Blue → White
            float ratio = i / 127.0f;
            color[0] = 255;                       // Blue stays high
            color[1] = static_cast<uchar>(255 * ratio); // Green increases
            color[2] = static_cast<uchar>(255 * ratio); // Red increases
        } else {
            // White → Red
            float ratio = (i - 128) / 127.0f;
            color[0] = static_cast<uchar>(255 * (1.0f - ratio)); // Blue decreases
            color[1] = static_cast<uchar>(255 * (1.0f - ratio)); // Green decreases
            color[2] = 255;                       // Red stays high
        }
        lut.at<cv::Vec3b>(0, i) = color;
    }

    // Step 3. Apply the LUT
    cv::Mat colored;
    cv::LUT(gray, lut, colored);

    // Step 4. Show results
    cv::imshow("Gray", gray);
    cv::imshow("Custom ColorMap (Blue-White-Red)", colored);
    cv::waitKey(0);
    return 0;
}