Operations and Maintenance
network card
- set IP for network card:
ifconfig eth1 192.168.1.100 - query speed of network card:
iftop -i eth1 - query status of network card:
ethstatus -i eth14.
ssh connection
SSH is abbreviation of Secure Shell. This post is based on Ubuntu 20.
install SSH
install SSH-clinet
sudo apt-get install openssh-client
install SSH-server
sudo apt-get install openssh-server
connection
1. without option
ssh 192.168.1.100
Default username is that in current terminal. Or you can specify username as below
ssh qing@192.168.1.100
Usually, we connect with specific username.
2. port
Default port for SSH is 22. We can specify port as need.
ssh -p 123 qing@192.168.1.100
It’s same with cmd below
ssh qing@192.168.1.100 -p 123
3. compress
Compress all data transferred by ssh.
ssh -C qing@192.168.1.100
specify config
Connect with specific configuration file.
ssh -F qing@192.168.1.100
configuration
Default configuration file is /etc/ssh/ssh_config.
keep connection
ssh will be terminated if it’s idle for a long time. If we want to keep connection, add txt below to configuration file.
ServerAliveInterval 60
Client will send a message to server to make connection alive if no data is transferred for interval(here it’s 60 seconds).
X11 forwarding
If you want to display application on client computer, you should set ForwardX11 as yes.
Find this option in configuration file and set it. If there isn’t this option, just add txt below to the tail of configuration file.
ForwardX11 yes
port forwarding
Refer to here
| option | |
|---|---|
-L |
local |
-R |
remote |
-D |
dynamic |
Assume that we have 3 Host(computer), A, B and C.
| host | position | port |
|---|---|---|
| A | destination | X |
| B | remote | Y |
| C | local | Z |
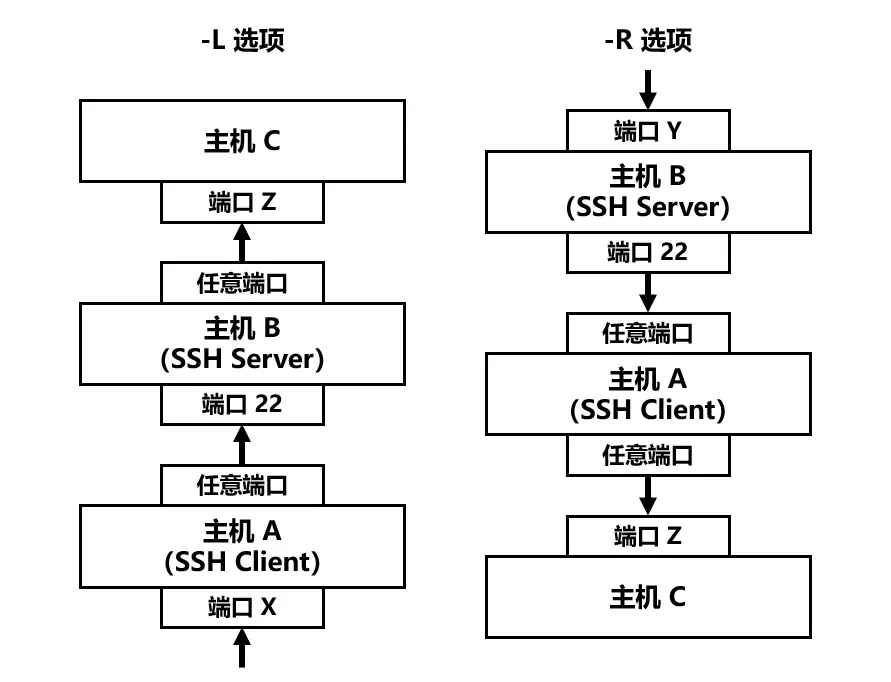
-R
ssh -R portY:hostC:portZ user@ip
example:
Perform cmd below on host A
ssh -R 8080:localhost:80 root@hostB
Now we can access host A by accessing hostB:8080.
Note that you should make sure that GatewayPorts in ssh configuration file on hostB has been set as yes. If you change this configuration, you should restart sshd to enable it.
If you get error like below
Remote port forwarding failed for listen port
Check whether another process is listening this port. It’s possible that you had created this tunnel but you tried to create same tunnel.
Proxy and VPN
Proxy Classification
forward proxy
User A send a request to proxy server and specify destination(server B). Proxy server transfer the request to server B and transfer respond to userA after receiving from server B. User A hide behind proxy server from server B. In this case, user A known there is a proxy server.
reverse proxy
Client send normal request to proxy server. Then proxy server transfer request and respond. In this case, user A don’t know there is a proxy server.
transparent proxy
Proxy server edit request fields and transfer data. Proxy server is the actual requester.
OpenVPN
OpenVPN is a open and free software. A VPN subnet is consisted if three parts, CA(Certificate Authority) server, VPN server and client(s).
WireGuard
WireGuard is a light VPN software. Although its security is challenged by net expert, it’s a good tool for fresh because its simpleness. unlike as OpenVPN, a VPN subnet is consisted of VPN server and client(s). Here are steps that I install and configure VPN. I use a cloud server with a static public IP as VPN server. I use ubuntu 20 for both server and client. Therefore, if you use other operation system, like IOS or Windows, you can refer to other instruction. Good new is that it’s much easier to configure on IOS or Windows than that on Linux distribution(such as Ubuntu 20).
1. Install WireGuard
# sudo apt update # This cmd isn't necessary
sudo apt install wireguard
I install it on both server and client. If your client is phone with IOS or Android, you can download WireGuard on APP Store or Google Play respectively.
2. Configure WireGuard
- Generate a private and a public key for both server and client
wg genkey | tee privatekey | wg pubkey > publickey
Now you can see two files: privatekey and publickey.
- Create a WireGuard configuration file:
/etc/wireguard/wg0.conf. Path and file name for client and server are same. Because I use OS for server and client. For client,
[Interface]
Address = 172.20.1.10/24  # Unique IP for this client in the VPN subnet
PrivateKey = UKRRtf/JwJHvePeYM+WE= # change to your client's private key
ListenPort = 5000

[Peer]
PublicKey = 7oO/3v4xR26A2IH/96O2HM= # change to your server's public key
AllowedIPs = 172.20.1.0/24  # Routes all traffic through the VPN
Endpoint = 24.46.35.87:5000 # change to your "IP:port" or "domain:port"
For server,
[Interface]
Address = 172.20.1.1/24
SaveConfig = true
# Usually, "eth0" is the primary network card
PostUp = iptables -A FORWARD -i %i -j ACCEPT; iptables -t nat -A POSTROUTING -o eth0 -j MASQUERADE
PostDown = iptables -D FORWARD -i %i -j ACCEPT; iptables -t nat -D POSTROUTING -o eth0 -j MASQUERADE
ListenPort = 5000
PrivateKey = ONRUZwQdZh51o= # change to your server's private key

[Peer]
PublicKey = zsoPqzlIT53MBJjV2w= # change to your client's public key
AllowedIPs = 172.20.1.10/32
If you are fresh, better not to change num “24” or “32” in above configuration file.
3, Enable IP Forwarding for Server
Modify your server’s sysctl settings to allow IP forwarding. This is usually done in /etc/sysctl.conf or a similar configuration file. You can add code below to this config file to enable IP forwarding.
net.ipv4.ip_forward=1
net.ipv4.conf.all.proxy_arp=1
4. Start and Stop WireGuard
Use cmd below to start
wg-quick up wg0
Use cmd below to stop
wg-quick down wg0
If you edit /etc/wireguard/wg0.conf during WireGuard is running. When you stop it, all your changes will be discarded. So better to edit /etc/wireguard/wg0.conf after stop WireGuard.
If you want to start WireGuard on boot
systemctl enable wg-quick@wg0
If you get this ping: sendmsg: Required key not available, you should check your configuration for your server and client. If you have double checked and everything is in his position, try to use another terminal software on your client. I used SecureCRT first. It close any proxy by default. I changed to default terminal and try again, it worked. Then I returned to SecureCRT, WireGuard worked normally.
domain and IP
ubuntu 20将域名指向指定IP
- edit file
hosts
sudo gedit /etc/hosts
- add pair of IP and domain (IP and domain below don’t exist, it’s just example)
256.543.234.764 s.top
- restart network
sudo systemctl restart NetworkManager
- test
ping s.top
successful if you see output as below
PING s.top (256.543.234.764) 56(84) bytes of data.
64 bytes from s.top (256.543.234.764): icmp_seq=1 ttl=48 time=20.6 ms
64 bytes from s.top (256.543.234.764): icmp_seq=2 ttl=48 time=25.3 ms
64 bytes from s.top (256.543.234.764): icmp_seq=3 ttl=48 time=20.7 ms
64 bytes from s.top (256.543.234.764): icmp_seq=4 ttl=48 time=21.0 ms